Pages

Tuesday 29 November 2016

Time...

Hi all,

Time is something I haven't had a lot of lately, but time is also an amazing entity in itself.  All the things that 'time' has created, especially in nature.

I have a huge love of fossils, being bought up in a fossiling family on the Dorset Heritage Coast.  My lovely mum found a 'Hybodus' Sharks skull, and I have proud pictures of her that I will share one day.  She was always down the beach at stupid times of the morning, and often I would go too.  My dad found many quarry fossils, and also was a keen beach fossiler, and my (not related.. lol) Uncle has an Ichthyosaur in the British Museum.  I have fond memories of that part of my childhood.  I also know how and where to find fossils, although you need permission now to remove fossils from the beaches.

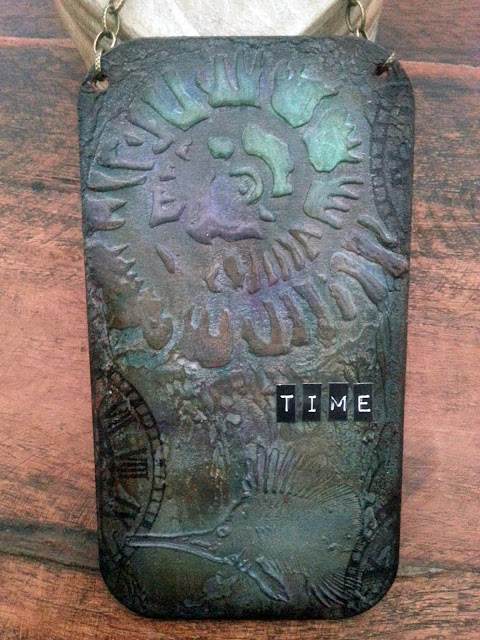
So when Andy Skinner's fossil stencil came out, I knew I had to have it.  Here is a little project I created, using just part of the stencil.  It reminds me of a real ammonite, as you do get rainbow colours within the shells, set into the stones you find them in.


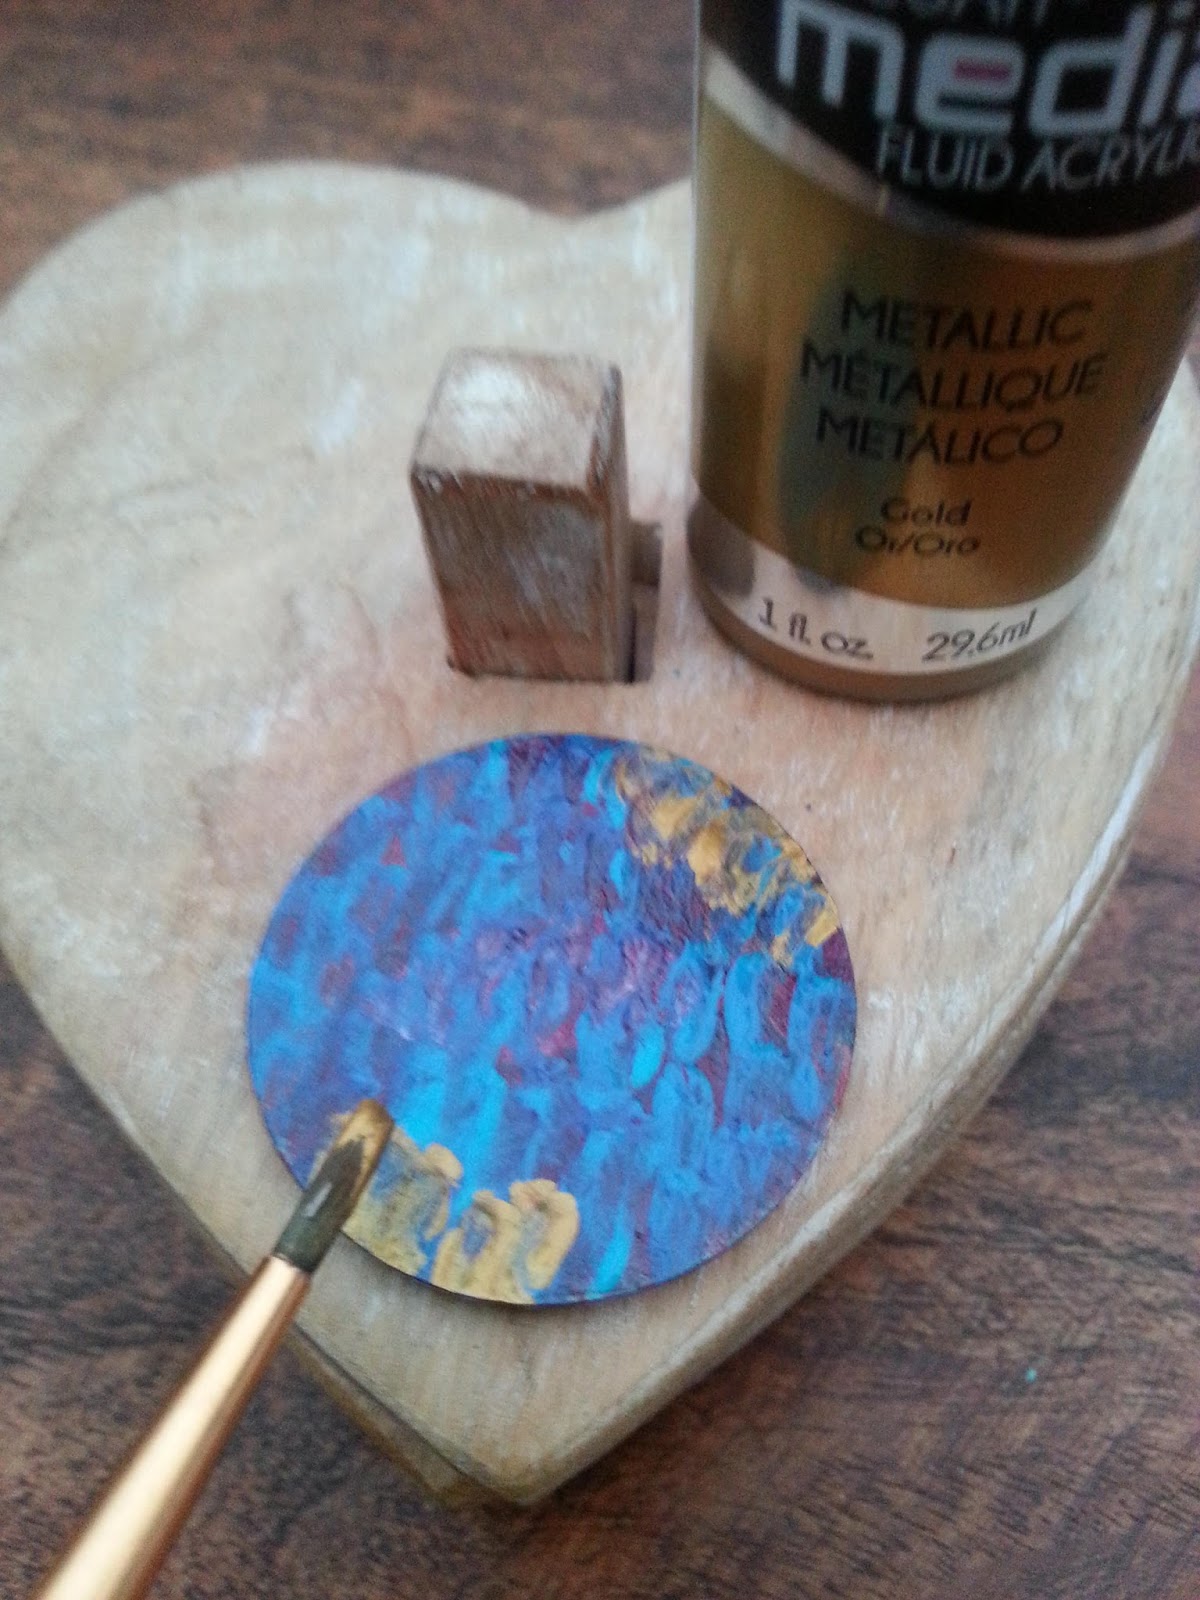
I stencilled the centre of the fossil onto a Tando Media Board, with DecoArt Modelling paste.  Let that dry, then smooshed more modelling paste around the edges, and at the bottom of the tag.  Into that I stamped an 'Ink & The Dog' stamp, of a fossilised fish, into the modelling paste.  Let dry, then started on layers of paint, which I don't know how many times I did, but I used DecoArtMedia Cobalt Teal Hue, Primary Magenta, Interference Magenta, Interference Turquoise, Interference Violet, Paynes Grey, Quinacridone Gold, and possibly another blue... I was having fun and lost count...


The outcome almost looked like real slate in places, and although that's not strictly where you will find fossils, the colour was good.  I then went over the fossil relief, with the three colours of intereference, in a rainbow effect, so a few sections in one, and so on.  This had some more Quin gold over, so it did dull it slightly, but I loved the effect.  I also painted inside the fish scales. 

I finished off with Andy's clock from the Steampunk set, and some sticker sentiments from Tim Holtz. 


I wanted to portray Time, and the amazing things that come from it.  I think this applies to all of us, not just nature or history, we call all learn, and grow, take a few minutes to look around you, take it in, to listen, to slow down, and take time. xx

Crafty hugs,

Nikki
xxxx

Products used:

DecoArt Media paints & Modelling paste.
UK/elsewhere Tando Creative Ltd
Media Boards - Tando Creative
Andy Skinner Fossil Stencil - Tando Creative


Thursday 24 November 2016

Ministry of Mixology DecoArt/Tando Project

Hi all,

Just recovered from a fantastic weekend at the Ministry of Mixology in Coventry, and a fab day at Hochanda for DecoArt & Tando Creative.  I promised a tutorial on the acrylic pieces from Tando that we did make and takes on at the Ministry, and I showed as a demo on tuesday.

These acrylic pieces are a great size, and are easy to work with, and perfect for necklaces, key rings, christmas decorations, hangings, anything really.  I set them into artwork as well.  You can paint on one side and keep the other shiny.

Firstly I peeled one side of the cover off of the acrylic shape, and stamped in DecoArt Media Carbon black paint, with Andy's 'All Seeing Eye' stamp from the Curiosity set.  Bear in mind that if you use a stamp with writing on, it will come out backwards on your piece as we work on the same side right through.  I just waited for the stamping to dry, then rubbed off the letters.


Once that layer is dry, I painted the inside of the eye, (still on the same side), roughly with either titanium white or Titan buff, your choice here.  You don't need to be neat, just try and keep inside the lines of the eye.


Next I painted the two triangle lines with gold, and then over and around that I used interference turquoise, using my paintbrush slightly tilted to flat side, so you just dab and leave gaps in the paint.  This allows further layers to show through.

Then I used primary magenta for the next layer.


The following layer was cobalt teal hue.


Then another coat of gold, but nearly all over.


Final layer is black, cover the whole of the back of the piece.  This stops any gaps showing, and also makes all the other colours pop.

When dry, turn your necklace over and peel the final piece of plastic cover off of the acrylic, your colours will be revealed!

Here are a few pics of necklaces I made from my pieces, just adding a leaf bail with pinflair glue gel.  I then added Liquid Glass on the back, to protect the paint layers, and secure the bail further.


When you move the necklaces around, they shimmer at the front from the interference paint.

I also made this Media Board tag, with the same principles on the acrylic.  I pushed clear acrylic pieces (covers still on), into modelling paste on a board.  I 'pinged' them back out, leaving a recess.  Left to dry, I then stencilled Andy's 'Codebreaker' stencil in the gap.  Layers of cobalt teal hue, quinacridone magenta, interference magenta, interference turquoise, and I think a bit of paynes grey and quinacridone gold, gave me a grungy, rainbow oily type of effect.


 I painted my acrylic pieces as the above tutorial, and put aside.  A final layer over the numbers of interference turquoise, made them stand out.  Finally the acrylic pieces were glued back into their places.


I hope this gives you some inspiration.

Best Wishes,

Nikki
xx

Materials Used:

Andy Skinner - Codebreaker Stencil
Andy Skinner - Curiosity Stamp set
Andy Skinner - Toxic Stamp Set

DecoArt Media Fluid Acrylics - Titan Buff, Primary Magenta, Cobalt Teal Hue, Interference Turquoise, Carbon Black, Paynes Grey, Quinacridone Gold, Metallic Gold.

DecoArt Liquid Glass

Tando Creative - Media Boards, Acrylic Shapes (shapes are new, may not be on website yet).
Tando Creative Mini Stencil - Leaves 1.


Friday 4 November 2016

Craft Stamper Magazine TIMI Challenge - November - Take a Stamp

Morning everyone,

Today is Craft Stamper Magazine's November challenge launch, and this month it's just 'Take a Stamp'.  This means any stamped creation (with a physical stamp), we'd love to see your entries, so hop over to the blog and take a look at the Design Team's inspiration, and get entering, there are fab prizes to be won as well.

Our sponsor this month is: The Artistic Stamper, and the prize is this lovely Mushroom stamp set.  Our random winner will receive this.


And our winner as picked by the DT will get a Guest spot in the magazine and blog, showcasing their work.

My inspiration this month is an old book cover, that I found at a car boot, and asked the bemused lady 'how much'.  As it was only a cover, I think she thought I was mad, and told me to take it away..

So 'The Calculating Cobbler'  became a base for a layered piece of artwork inspired by the lovely Tracy Weinzapfel Stratton.  (I kept the cover as the reverse, hence you can see gesso peeking over from the other side).


I first punched out some circles of text and glued them to my base, to give texture.  Then painted in shade's of teal and orange.  I layered this, and when I thought I was happy with my base, was going to use a different stamp altogether.  When it came to stamping it I dropped the stamp on the background, and double stamped the image, thus 'ruining' my work.  But as we know in art there are no accidents, so I set about layering more teal and orange paint, to cover where I had stamped, but some still shows through and I loved my new base.
When dry I added Totally Tracy texture stamp, in teal, then black to area's of the canvas.


 I used Andy Skinner's Codebreaker stencil as well.  The flower stamps are all Tracy's.  They were stamped onto rice paper, cut out and adhered to the base, then painted with DecoArt Media paints. A liner brush was used to draw the stems and round the petals again, and white dots added with my trusty acrylic sharpie.


The sentiment was added and my little panel is finished.


Hope you like it.


Don't forget to check out the Craft Stamper Challenge, and join in with us this month.  It's so much fun and the prizes are well worth it!

Best Wishes,
Nikki
xxx


Friday 9 September 2016

Craft Stamper Take it, Make it Challenge Reminder - September - Take a Stamp.

It's September's Craft Stamper TIMI Challenge reminder, and over on the blog there is some more inspiration for you from my lovely team mates.  First though, here's what you can win:

Our sponsor this month is Visible Image.

And the sponsored prize from them is 3 stamp sets!


Our other prize as always is the DT chosen winner, who gets a guest spot on the blog and in the magazine!  Hop over to the Challenge to find out more.

My inspiration for you today is a little necklace, with Jewel the Unicorn.


He was simply stamped onto shrink plasticwith Stazon Jet Black, and coloured in with watered down Sleeping Beauty, Snow White, and Pink Iced Gem mixed with a little Lemon Meringue Cottage paints.  His tail is shimmery from mixing the Snow White and Sleeping beauty, to give a very pale blue. At this stage, punch any holes you need for hanging, it's harder to drill the plastic after!

Once shrunk, I coated him with a layer of IndigoBlu's Diamond Resin, to protect the paint and make him shine even more.  He was then attached to a chain, and little fairytale castles and snowflake charms attached.


The theme this month is 'Take a Stamp', so any stamped piece you have made recently would be fab, just hop across and join in on the Craft Stamper blog.

Best Wishes & Good Luck,
Nikki

Products Used:
IndigoBlu Shrink Plastic pack.
IndigoBlu Diamond Resin
Stazon Ink Jet Black
IndigoBlu Cottage Paints.

Friday 12 August 2016

Craft Stamper August TIMI Challenge Reminder - 'Stencilling & Masking'

Hi all,

Today is Craft Stamper Take it, Make it Challenge reminder day, and our theme is 'Take a Technique' this month.  So the technique we have given you is 'Masking and stencilling'.

My inspiration contains stencilling today, and lots of it!  

I started by painting a 12 x 12 canvas board in DecoArtMedia paints, Hansa Yellow Medium, Cobalt Teal Hue and Primary Magenta, all mixed a little with Tinting Base to give me lighter shades.  On top of the base, I used a stencil with distressed elements, and stencilled the three colours neat, through parts of the stencil on co-ordinating base colours.  These are the sequin waste dots, pink lid rings, stripes etc.  


I then sprayed the canvas to tone down the base colours, with DecoArt Media's 'Media Mister', in White shimmer.  This gave the lovely splats and toned down the background.  
More stencilling with Andy Skinner's stencils commenced, I used the 'Industrial Elements' stencil.  


I added circles with Tinting base and a Sharpie pen lid, and then stamped Andy Skinner's crackle stamp from the Toxic stamp set in Versafine black.  I added Tracy Weinzapfel Stratton's gorgeous dots from her Totally Tracy Textures stamp set, both in ink and Tinting Base, and then edged the canvas with my fingers and DecoArt Media's Quinacridone Magenta, and added lines with the edge of an old credit card in the same colour, and a few smudges with my finger.


My trusty Acrylic Sharpie pen then came in to squiggle in a few of the circles from the first stencil, and add dots on top of some of the black stamping.  

I added some lines of washi tape on top of each other, and used one for the fab Whimsy Girl   stamp by our very own Trish Latimer (available in her Etsy Store).  I stamped her on card and watercoloured her with the same palette of DecoArtMedia acrylics as in the background, mixing a little yellow, pink and tinting base for the face, neck and arms. 


A few more white dots with my Acrylic Sharpie, attached her to the canvas and gave her some grounding with a little Payne's Grey watered down. 

To finish, I took an IndigoBlu sentiment from 'Floral Fantasy' stamp set, heat embossed and cut out, and edged with a gold Sharpie pen.  I also pencilled around the words on one side and bottom to ground them more.  


Hope you like her :)  

Our wonderful sponsor of the random prize this month is the gorgeous Gio, with her own range of stencils:


You can see all the Design Team's work, and the prizes on offer, along with the guidelines and how to enter, over on the Challenge Blog.

Hope you can join us!

Best Wishes,

Nikki
xxx


Friday 5 August 2016

Craft Stamper August TIMI Challenge - Stencils & Masks

Morning everyone,

It's time for the new Craft Stamper Magazine's 'Take it, Make it' Challenge. Our August challenge is to 'Take a technique', and we'd love to see your Stencilling and Masking this month.

We have two prizes on offer, as always. The first is the Sponsor Prize, and the winner of this will be randomly chosen from all the eligible entries of the challenge. To make sure your project is eligible to win, make sure you have followed our challenge guidelines.

PLEASE REMEMBER: We only want to see ONE project in each individual blog post entry (a set counts as more than one), and you MUST link back to Craft Stamper Magazine in your post.

Our wonderful sponsor of the random prize is the gorgeous Gio, with her own range of stencils:


As always, we will also have a Design Winner this month.

This winner is chosen by our DT, who all vote for their favourite design from all of the entries. This winner will have their winning project published in Craft Stamper Magazine, (with a 2 page spread of their very own!), they will have a GDT slot for an upcoming challenge, and will also feature in their very own Winners Profile blog post!

Here is my inspiration for you this month:

First I stamped the flower from Indigoblu's Floral Fantasy onto the card and embossed, and onto a piece of paper. I cut the paper out and masked the flowers, then took Peppermint Tea and Lime Marmalade Cottage paints, and stencilled the new Indigoblu rose stencil all over the top with the two colours.

I removed the mask, and coloured in the flowers with Grandma's Teacup, and the leaves in Emerald City.

I stamped and embossed the butterfly, and words, and cut out. The sentiment was coloured with the same paints, and edged in green stazon. The main card was also edged.


I stamped the butterfly on top of the stencilling, to keep the antenna's, and put the cut butterfly over the top and bent the wings up slightly.


So hop on over to the Challenge and see the rest of the team's fab work, then join in!  I hope you have fun getting inky and painty with those stencils and masks!

Best Wishes,

Nikki
xx

Monday 18 July 2016

A catch up...

Morning everyone,

I haven't shared some pieces I've made lately, it's been mad busy and I've not had much time to do my 'own thing', but I made a couple of samples for the recent Dare to Create weekend organised by Sue at Art Workshops, and Andy Skinner & Tracy Weinzapfel Stratton.

I was booked on to the retreat as an attendee, and it was a fantastic weekend all round. A huge thankyou goes out to all involved in the organisation for a lovely weekend.  I'll share my makes at some stage from there too, but these are the pieces I made myself for Sue for her shop for the weekend.

My brief was to make something that incorporated Andy and Tracy's style, so 'Skinzapfel' was the order of the day.  The first piece I made was a canvas,


I painted the base coat in DecoArt Media pyrrole red and cadmium orange hue, and then went over with crackle paint, leaving the heart shape and flowers empty in the middle.  Once the crackle paint was dry, I used a cogs stencil inside the heart with DecoArt texture paste through.  I then added sand texture paste randomly around the edges and over the cogs to distress them further.  This centre panel was then painted in Andy's Rust technique.  The outer colours were prussian blue hue and cobalt teal hue, and a little turquoise hue.  I stamped randomly with carbon black and Tracy's stamps on the blue background.


The hand drawn flowers were painted in pyrrole red and hansa yellow medium.  I went round all the edges with a Faber Castell pitt pen and smudged the black lines, and also some more prussian blue around the heart to give shadow.  A computer sentiment was printed and coloured to match, scribbled round and adhered to the canvas.


Finally I edged the canvas in a little prussian blue hue to darken it and bring the focus in to the centre of the canvas.

My second make I wanted to keep, it's very simple but I kinda liked it :)

I took a second hand mirror from a car boot, and painted in black DecoArt Gesso.  I then added plumber's aluminium tape to pieces of black card, and used a spellbinders Mbossabilities folder called Industrial, to run the card with tape on through the Big shot.  I cut the pieces of card into different rectangles, and adhered to the mirror with matte medium. Carbon black was then dry brushed into all the crevices and across the mirror, and wiped back with a slightly dry baby wipe, repeated a few times.


 I then stamped Tracy's stamp Vines of Love onto normal 3 ply tissue, cut out and separated the ply.  I adhered this to the mirror with matte medium also, going over the top of the tissue very carefully to seal to the mirror.  I added a stalk to the flower in blue green light and green gold, and painted the flower in quinacridone magenta and hansa yellow medium.  I made sure you could still see the edges of the flower by running round with a micron pen.


The only other thing was to dry brush the edges of the black gesso'd mirror with some metallic silver paint to tie it in, and it was finished.


I love the simplicity of this, and Tracy's style with the industrial look.

Hope you've enjoyed the steps through these, I certainly enjoyed making them.

Best Wishes,

Nikki
xxx


Saturday 16 July 2016

Mega excited and proud! - PaperArtsy 3UP..

Hi everyone, 

A couple of months ago I was picked to join in with a secret blog.  Today it's here, and  I am super proud to be a part of the PaperArtsy 3UP blog!

Once we accepted the mission, we joined a secret facebook group, and met our fellow posters for the same evening, and had chance to chat about our makes and colours, and get to know each other.  Then we just had to keep it a secret until this week :)

If you head to the main page, you will see all that's been going on over the past week or so, and my team mates posts for today as well, you can also see their pieces over on their own blogs too.

My inspiration piece was using the PaperArtsy HotPicks stamps, and 'crayons'.  I used Portfolio's, they are lovely and rich and creamy and blend beautifully.  And the colours were right up my street!

I first gesso'd the background in white, and added some texture through a circels stencil, so the colours of the crayons popped on top.  I randomly added the crayon in different colour patches, and just blended them gently with my fingers, it didn't take much, they work really well.  On top of this the background was stamped in toning inks, stazon pumpkin and cherry blossom pink, and then I stamped in gesso to bring in the white elements and versafine black ink for the rest.


The tag was made in exactly the same way, crayon then stamping, and I absolutely loved the butterflies and steampunk moth's on the Hot Picks stamp sets I was given to work with, and the sentiment too.  These have now already become a firm favourite stamp set for me, and are turning into a bit of a 'go to' set.  I do have a good few of PaperArtsy's stamp sets, but luckily didn't have any of these and I'm over the moon with them.

I stamped the steampunk moth onto separate card, and fussy cut out, to anchor the tag at the bottom and lead up at the top.  I stamped him on the page first so he still had his antennae, as I'm a bit rubbish at cutting things that fine!  


I layered the tag up, and added a dark shadow around the edge to make it stand out a little from the background, you can remove the tag still as I used pads, I thought if I liked it separately I could do something different or change it up, or use the tag on a card at a later date.  The sentiment was edged with versafine, and cut out and layered on pads also.  The butterflies were curled and added with pinflair glue, and they are coloured in the portfolio crayons, but I embossed them with versafine and clear embossing powder to make them stand out.


So you can see I created a VERY bright and busy journal cover, but I like it, I think it's happy.  I hope you can join us on the PaperArtsy blog, and check out Chris and Donna's pieces tonight also.  


Look forward to hearing from you,

Best Wishes,

Nikki
xx

Wednesday 6 July 2016

Craft Stamper July TIMI Challenge Reminder - Take a Stamp

Hi everyone,

It's Take It, Make It, challenge reminder time over at Craft Stamper, and the theme this month is 'Take a Stamp'.

We have two prizes on offer, as always. The first is the Sponsor Prize, and the winner of this will be randomly chosen from all the eligible entries of the challenge. To make sure your project is eligible to win, make sure you have followed our challenge guidelines.

PLEASE REMEMBER: We only want to see ONE project in each individual blog post entry (a set counts as more than one), and you MUST link back to Craft Stamper Magazine in your post. 

This month's sponsor prize to our random winner is: Calico Craft Parts, and the fab prize is 3 aperture ATB kits, 4 beach/nautical mini shape sheets, seashell frame ATC blank, nautical shrine kit. They arrive flat packed, you have to assemble them yourself, it's very easy.


As always, we will also have a Design Winner this month.
This winner is chosen by our DT, who all vote for their favourite design from all of the entries. This winner will have their winning project published in Craft Stamper Magazine, (with a 2 page spread of their very own!), they will have a GDT slot for an upcoming challenge, and will also feature in their very own Winners Profile blog post!

My inspiration for you is a little bracelet I made from the lovely new Indigoblu stamp, Dinkie Rose, bought out for their 5th birthday.  I simply stamped onto shrink plastic, cut each rose out, and coloured with Marshmallow and Lemon Meringue paints, watered down. 

I punched holes in each with a cropodile before shrinking the plastic one at a time with my heat gun, and used an acrylic block to make sure they were flat on my heat mat.

A jump ring was attached to each, then attached to a bracelet chain.  Some freshwater pearls were added on headpins.


I made a simple pair of earrings to match, think this is a really summery set!  


So don't forget to join in over on the Craft Stamper blog, we'd love to see your entries!  It can be any kind of artwork/make, as long as you have used rubber stamping on it. 

Have fun!

Best Wishes,

Nikki
xxx